New Avocado Toast

Avocado Toast topped with Fried Egg

Avocado Toast topped with Fried Egg

Avocado toast is the latest rage-it’s being offered on menus in almost every cafe and  bakery I’ve been to lately. Actually, it’s so easy to prepare at home. No reason to pay a lot for this simple dish! As you probably know, avocados are a healthy food choice; here’s some of the reasons Why Avocados are a healthy food choice.

Avocado toast is even more delicious topped with a fried egg; more protein and a great breakfast, especially with some fruit to complete the meal. We like citrus, especially the little tangerines that we find now at farmers’ markets. Here’s my recipe for this avocado treat.

INGREDIENTS (serves 2)

  • 1 medium size avocado
  • 1-2 Tbsp. Mayonnaise
  • 1tsp. unsalted butter
  • 2 slices cheese- we use goat Gouda slices (Trader Joe’s sells pre-sliced Dutch goat Gouda that we like))
  • 2 large eggs
  • 2 slices whole grain bread
  • salt free seasoning (or salt if you like), ground pepper, lemon juice; to taste
  • fresh herbs- chopped chives or dill or your choice
  • Paprika or smoked Paprika

TO DO

  1. With a fork, mash the avocado and the mayo together; (not too smooth- should have some chunkiness). Set aside.
  2. Add salt, (or no salt seasoning), and pepper to taste; (also a squeeze of lemon if you like.)
  3. Toast the bread.
  4. Put a slice of goat cheese on each toast; either microwave for 20-30 seconds until cheese is slightly softened or saute toast topped with the cheese for 1-2 minutes to soften the cheese. (I actually prefer the microwave method- but either works fine.)
  5. Spread avocado mixture thickly on top of the cheese toast.
  6. Melt butter in a hot nonstick pan; crack eggs gently into the pan and fry til whites are opaque and edges are brown and crisp; turn over and cook an additional 10-20 seconds (depending on your preference for the firmness of the yolk).
  7. Top each avocado toast with hot fried egg.
  8. Garnish with fresh chopped herbs.
  9. Sprinkle with Paprika (or smoked Paprika) to add a bit of color

That’s it- avocado toast-so easy and delicious!

Enjoy!

www.type2delicious.com

beautiful fruit salad with oranges, raspberries, kiwi and blueberries

Video #2! Beautiful Fruit Salad with no-sugar Raspberry Sauce

Here’s the link to make beautiful, low carb fruit salad with raspberry sauce– follow the step-by-step video!Make this beautiful fruit salad!

Follow the video link to make beautiful fruit salad with a no-sugar, low carb raspberry sauce. I’ve made this with all kinds of fruit–and it’s always been a big hit at my dinner parties or when I’ve brought it to others. One thing that makes it look so beautiful is to make sure that you add a variety of colors, using fruits such as kiwi, for green, peaches/nectarines in summer for orange/yellow, oranges/tangerines for the same in winter, blueberries and raspberries, etc. The raspberry sauce is made with frozen berries, so the season doesn’t matter. It’s so good and a great dessert for those who want a delicious, sweet, yet low carb treat.

My brother Dan Mainzer, a professional photographer/videographer, (Mainzerphotography.com) was here in Santa Cruz last winter, and we collaborated on a series of three recipe videos. Hope you’ve seen the first one, how to roast Delicata Squash, now followed by How to Create a Fruit Salad with No-Sugar Raspberry Sauce, and coming soon, a Making a Scrumptious Cheesy Appetizer.

I hope you like them! Please let me know if you have any questions or comments.

Enjoy!

Susan

Blanch Your Veggies! And a sauce to go with…

A variety of colorful blanched vegetables

Beautiful blanched veggies!

imageimageimageWhen much of your diet is low carb and you prepare recipes with lots of vegetables there’s often a great deal of chopping and prep work. Or you eat lots of raw vegetables, especially for appetizers with hummus or other low carb dips. (I admit that can get boring). One way I’ve found to enjoy fresh veggies and have them on hand for snacks and appetizers is to blanch a lot of them at one time.

Actually I’d never blanched a lot of veggies at one time, (I had done a few just for a one time use); then I was invited to a large party and had volunteered to bring hummus and a quantity of veggies. I had had enough of raw veggies for awhile so decided to try blanching them. And it was a revelation! They were so much tastier than the raw–tender, fresh and full of flavor- some crisp, some not so, but still very tasty; (this is a process–there’s a big difference in blanching a few to doing a few pounds). I chose asparagus, carrots, zucchini, yellow squash, red peppers and bright green pea pods- not only good to eat but good to look at–beautiful!

Blanching means boiling vegetables for a few minutes and then plunging them into ice water; one kind at a time. One trick/method I learned from Cook’s Illustrated is to blanch the darker vegetables last as they can discolor lighter vegetables, (as you use the same pot in turn for all the veggies — details in the TO DO section).

I invite you to blanch a quantity and variety of your favorite veggies–store in the fridge for a week of snacks or serve to your guests and/or family for a delicious, healthful treat.

INGREDIENTS/SUPPLIES 

  • 1/2 lb. each of a variety of vegetables (your choice), such as carrots, zucchini, yellow squash, asparagus, snap peas, red pepper, cauliflower…)
  • 1 red and/or yellow pepper
  • A large pot to boil the veggies in
  • a large bowl filled with ice cubes and cold water
  • A large slotted spoon
  • paper towels on a large plate or tray
  • EASY TASTY SAUCE:
  • 1/3-1/2 cup Mayonnaise (Best Foods, or make your own)
  • 1/2 -1 tsp. Siracha (to taste)
  • juice of 1/3 lemon

TO DO:

1. Wash (don’t peel); then slice vegetables into matchstick or 2″ long slices; snap asparagus in half.

2. Prepare ice water bath in bowl next to the boiling water

3. Bring water to boil in a large pot or Dutch oven

4. Add sliced veggies into the boiling water, starting with the lightest colored vegetables; (make sure the water is boiling for each batch). For example, I started with the cauliflower, then yellow squash, zucchini, carrots, peas, asparagus, red pepper).

5. Boil each batch for 1-2 minutes.

6. Immediately lift out with a large slotted spoon or a sieve and plunge into the ice water for 1-2 minutes. (You’ll most likely need to add ice for each batch as the hot veggies will increase the temperature.)

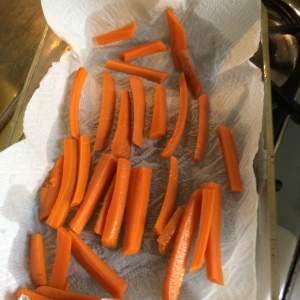
7. Lift out each batch from the ice water and drain on paper towels.

8. Repeat for each type of vegetable.

9. Mix sauce and let sit for at least 1/2 hour.

10. Refrigerate if not serving right away.

Enjoy! www.type2delicious.com