Carmelized Onion, Tomato, and Goat Cheese Tart

Baked tart of onions, tomatoes, and goat cheese won a pastry shell

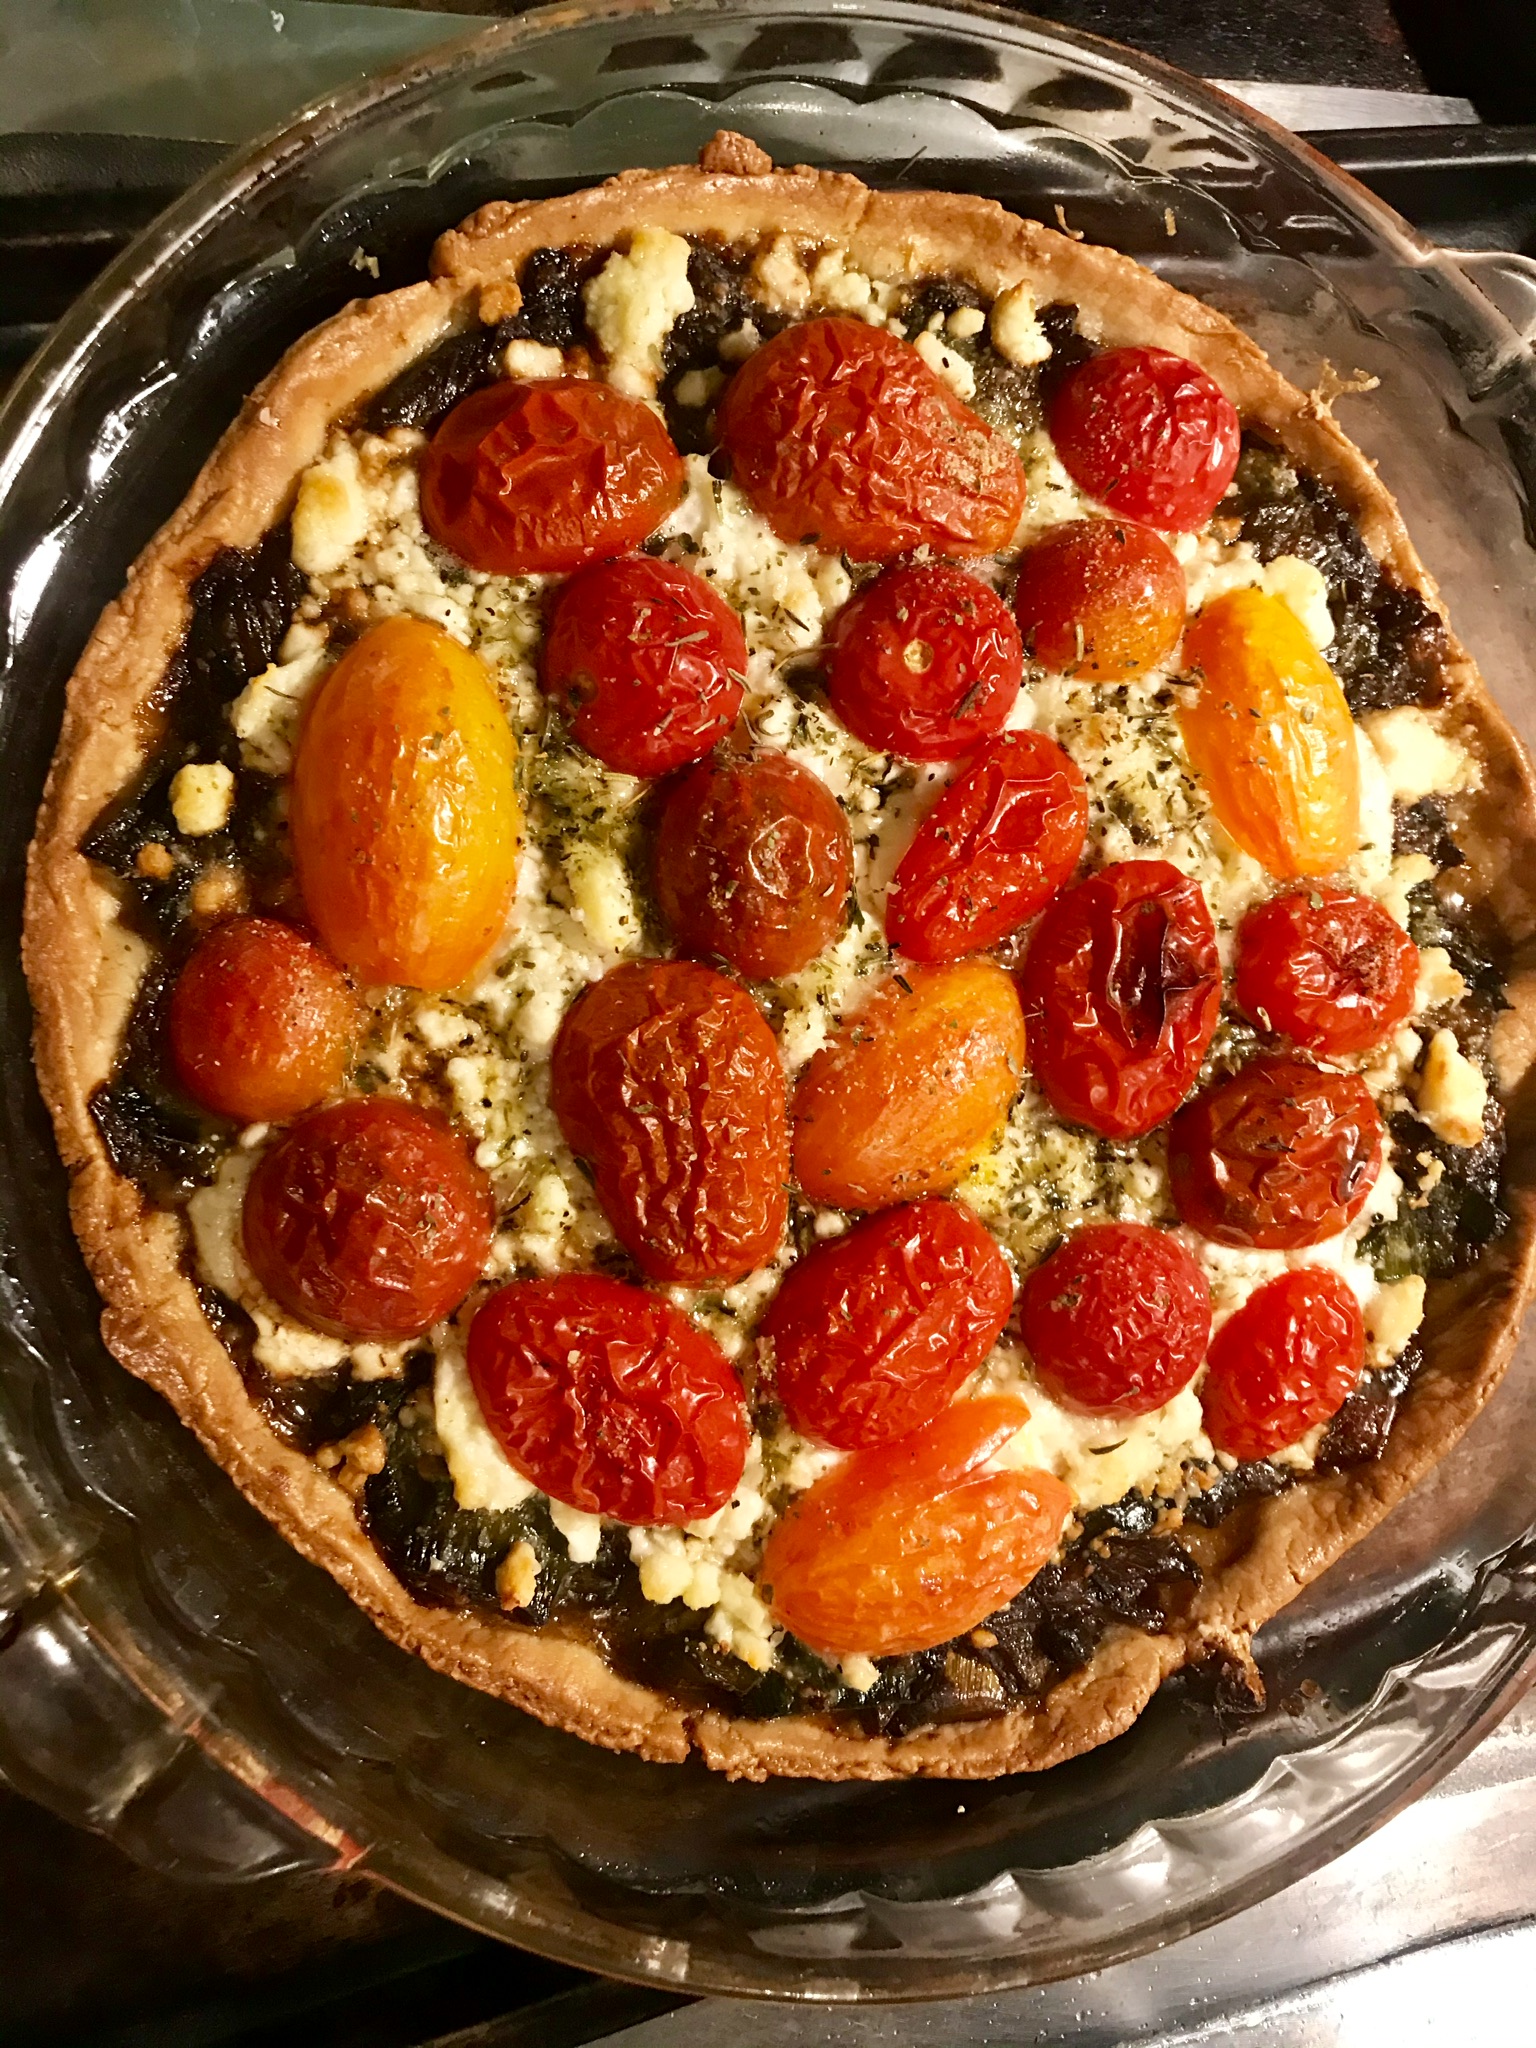
Delicious vegetable tart with onions, tomatoes and goat cheese

Carmelized Onion, Tomato, Goat Cheese Tart

Every so often we crave something luscious and extra delicious. This tart fills the bill! It’s a bit decadent, but the ingredients are fresh and good. The pastry is thin, so not too many carbs if you stick to a moderate serving. I use store-bought organic pie pastry which states that 1/8 of a pie shell is 120 calories, and 13 gms. of carbs, so you can use that as a guide for your own diets.

Recently I learned a better way to carmelize onions from Cook’s Illustrated, a great cooking resource. One thing is to add water immediately to the onions before browning, and another tip is to add a Tbsp. of water mixed with 1/8 tsp. of baking soda at the end of the cooking process. More details in the “To Do” section below.

This is a great way to use cherry tomatoes from one’s garden, or a farmers’ market. You can use any tomatoes, of course, but the cherries look so pretty; plus we have an abundance of them this year, as I planted a lot while we are sheltering in place!

This tart is a big treat for guests as an appetizer, or as a lunch dish; (when we can have guests, with appropriate social distancing). And, of course, for you and your family. It’s become a favorite of ours. Hope it becomes yours too!

My thoughts and good wishes for you and your loved ones to stay healthy and stay calm.

INGREDIENTS

  • 1 store bought or homemade pie shell
  • 1-3 red and yellow onions, depending on size, (and/or leeks- optional), sliced through the root end to approximately 1” slices
  • 3/4 plus 1Tbsp. Water
  • 1/8 tsp baking soda
  • 1Tbsp. olive oil and oil spray
  • 8-10 cherry tomatoes, halved horizontally
  • 1/2 cup crumbled soft goat cheese
  • 2-3 tsps Minced thyme, basil, chives or any fresh or dried herbs ( if using dried- use 1tsp.)
  • salt or non salt seasoning to taste (add to the onions)

TO DO: (makes 6-8 servings)

1. For the onions: bring onions, 3/4 cup water, oil, to boil in a non-stick skillet over high heat, cover lightly, and cook until water evaporates, and onions start to sizzle, about 10 minutes. The water breaks down and softens the onions cell structure more evenly than dry heat.

Uncover, reduce heat to medium, cook and gently press onions down and brown them, making sure all surfaces are browned; about 10-15 minutes.

Combine baking soda and 1Tbsp. Water – add to onion mixture and cook, stirring constantly until solution is evaporated, about 1-2 minutes. (This baking soda speeds up the sugar conversion in the onions, without added sugar, as in many recipes.)

Either use right away, or keep in fridge up to 3 days.

2. Thaw pastry shell according to package directions, and spread onto a round pan or cast iron skillet, which has been sprayed on the pan’s surface. Note: this is the step that can take advance planning- it takes a couple of hours to thaw pie shell if frozen.)

3. Preheat oven to 425 degrees.

4.bake empty pie shell 7-8 minutes. Remove and let cool 5-10 minutes.

5. Spread onion mixture evenly onto pie shell, then spread goat cheese on the onions, and halved cherry tomatoes on top. Sprinkle herbs on top.

6. If using a pie pan, put on a baking sheet, and bake for 20-25 minutes, rotating 1/2 way through baking. (No need for baking sheet if using cast iron skillet.)

7. Put on rack and let stand 10-15 minutes. Slice and serve!

That’s it!

If for lunch, serve with a crisp green salad with a tart, lemony vinaigrette–see previous Salad posts for the vinaigrette recipe: https://wordpress.com/post/type2delicious.com/1075

Salad posts for the vinaigrette recipe: https://wordpress.com/post/type2delicious.com/1075

Enjoy!


www.type2delicious.com

Advertisement

Easy Vegetable Lentil Soup

Easy Vegetable Lentil Soup

Sorry I haven’t written for a while. I had a total knee replacement and it’s taken a lot of time to recover.

Since now we’re all sheltering in place, The is a perfect recipe to have. It’s easy to make, with versatile ingredients, and makes a lot of food that can cover several meals, or eat some and freeze some.

Also, unlike dried beans of any sort, lentils don’t have to be soaked and cook quite quickly. They are tender in approximately one hour. Lentils are also very nutritious, low in carbs and fat and have lots of fiber.* You can add whatever vegetables you have in your larder, fresh, canned or frozen. We are very lucky to have access to fresh produce at this time, and I hope you do as well.

My thoughts and good wishes for you and your loved ones to stay healthy and stay calm.

INGREDIENTS

  • 16 oz. dried lentils, any type ( green, brown, pink)
  • At least 2cups liquid per cup of lentils—I use chicken or vegetable broth ( or more if the soup is drying out)
  • 1/3 cup dry red or white wine (whatever you’ve got)
  • large can (28 oz) diced tomatoes with juice
  • 3-4 carrots sliced
  • 2-3 celery stalks chopped
  • 1 medium onion, chopped
  • 3-5 cloves garlic, chopped (we love garlic- use less if you don’t )
  • 2-3 Tbsp. Olive oil
  • Salt or Salt free seasoning, and spices such as thyme; to taste
  • any other vegetables you like, such as green beans, zucchini, red or yellow peppers, peas etc. Canned or frozen are fine. (add additional liquid if adding vegetables)
  • optional: sliced cooked sausage or ham

TO DO: (makes a large pot of soup- enough for 6-8 servings)

1. In  a Dutch oven or 6 qt. pot, Sauté onions, celery, carrots in olive oil for 4-6 minutes.

2.Rinse lentils, and remove any that look shriveled or black.

3. Add lentils to pot. Add Tomatoes, liquids and garlic and other seasoning

4. Cook on stovetop for approx. 1hour, tasting for lentil and veggies tenderness

That’s it!

Serve With whole grain or whole wheat bread, and, as we usually have, a crisp green salad with a tart, lemony vinaigrette–see previous Salad posts for the vinaigrette recipe: https://wordpress.com/post/type2delicious.com/1075

Salad posts for the vinaigrette recipe: https://wordpress.com/post/type2delicious.com/1075

Enjoy!

*https://www.medicalnewstoday.com/articles/297638

www.type2delicious.com

My Mom’s Turkey Soup

Chopping celery

My Mom’s Turkey Soup

My mother was a very busy pediatrician who rarely had time to cook; (my grandma lived with us and did most of that. We were very grateful as she was a superb cook.)

Thanksgiving, however, unless there were medical emergencies, was a lovely relaxed time in our house. Mom took advantage of this break to use the turkey carcass to make a delicious turkey soup chock full of vegetables, garlic, wine and chunks of turkey from the carcass. It’s also easy to make and I’ve never had any better!

I made it without noodles, but you could add whole wheat or other whole grain noodles of your choice, as now there is a good selection of these.

INGREDIENTS 

  • 1 turkey carcass, split into halves (or smaller pieces, depending on your pot)
  • 3-4 large carrots, sliced in 1/2 ” rounds
  • 1 cup celery, chopped; using “Cook’s Illustrated” magazine’s technique: wash the celery to the point that you’re using, then instead of tearing off the stalks, cut from the whole (see photo). I’ve found it much more convenient and easy.
  • 1 large onion chopped into 1/2″ pieces
  • 3-4 cloves of garlic- chopped fine. We love garlic; use as many to your taste.
  • 1 cup dry white wine
  • Turkey, chicken or vegetable broth to cover the carcass (approx. 1 quart). I use a combination of turkey broth I make from the giblets and a commercial low sodium chicken stock.
  • 1-2 Tbsp. Olive oil
  • Herbs; your choice, but make one a bay leaf.
  • No-salt seasoning (Trader Joe’s has a good one; 21 Seasoning Salute)

TO DO

1. Heat a large sauce pan, add olive oil. Sauté onions on medium heat until transparent ( approx. 5-7 min.)

2. Remove the onions, add and sauté carrots and celery in the pan. After about 7 minutes add garlic and continue for approx. 2-3 minutes, making sure garlic doesn’t burn.

3. Put the carcass in a large Dutch oven or stock pot, add the vegetables and cover to the top of the carcass with broth.

4. Add wine, bay leaf and other seasoning.

5. Bring to a boil and then turn down to low to simmer for 45 min. to 1 hour, until vegetables are tender and meat falls off the bones; or longer, depending on your timing.

6. Remove the carcass from the pot and strip off the meat- chop and return meat to the soup.

7. Serve with good whole grain toast or noodles.

Enjoy!

www.type2delicious.com

German Tangy and Sweet Red Cabbage

My Grandma’s Sweet and Tangy Red Cabbage (Rote Kraut)


Bowl of Red Cabbage made with sugar and vinegar on a mosaic table My Grandma’s Sweet and Tangy Red Cabbage (RoteKraut) 


It’s that time of year again? Wow- so fast! This year we’re having Tday 1 early, a week before the actual day, as I’m having a knee replacement early December. It will be at our house again with my son Alex, his girlfriend Shannon, a few friends, and my son-in-law’s parents. (My son-in-law is in the Navy, stationed in Japan, with my daughter and our two grandkids. I’m making authentic German red cabbage. Actually, it was my son’s request–and I was happy to make the recipe. It’s very easy. The trick for the best results is to use no water, just red wine and red vinegar for the liquid. Also it does take a few hours to cook to the right tenderness and flavor, but is just as good if made in advance and reheated. In fact, that’s my favorite method.

When I have had red cabbage at most German-type restaurants I find it too sweet. The way my Grandma made it it is on the tangy side, with just a hint of sweetness, from the apples and sugar, (in this case, Xylitol. ( If you’ve been following my blog, you know that’s my preferred sweetener for low carb sweetening.) It’s such a great way to enjoy a dish that’s not often served, that is low carb, low calorie, and is full of flavor, fiber, and nutrition *.


Dining table with my son and his girlfriend at the end Thanksgiving2–my son and his GF at our table

GERMAN TANGY AND SWEET RED CABBAGE

INGREDIENTS

  • 1 red cabbage (size–your choice) this recipe is for about a 1-2 lb, cabbage
  • 1-2 apples,  sweet/tart, such as Pink Lady, or Pippin, cored and chopped (I do peel them, but leave some peel on)
  • 1-2 Tbsp. unsalted butter (the butter gives a smoothness to the result)
  • 1 cup dry red wine (use more if the cabbage is drying out)
  • 1/2 cup good quality red wine vinegar
  • 2-4 Tbsp. Xylitol –to taste
  • Salt or Salt free seasoning–to taste

TO DO: (serves 4-6 as a side dish or 2 with leftovers)

1. Remove cabbage outer leaves and inner core; chop cabbage into approx. 2 “ pieces

2. Core and peel apples, and chop into approximately 1/2″ pieces

3. Add all ingredients into a Dutch oven or 4 qt. pot.

4. Cook on stovetop for approx. 3-4 hours, tasting for sweet/tangy balance and tenderness

That’s it!

Serve as a side dish; and, as we usually have, a crisp green salad with a tart, lemony vinaigrette–see previous Salad posts for the vinaigrette recipe: https://wordpress.com/post/type2delicious.com/1075

Salad posts for the vinaigrette recipe: https://wordpress.com/post/type2delicious.com/1075

Enjoy!

*https://www.livestrong.com/article/272966-red-cabbage-nutrition-information/

www.type2delicious.com

Knife Skills! A Class on Using Chef’s Knives Properly

Man and woman using chefs’ knives

Knife Skills! How to use knives properly

Learning how to improve my Knife Skills is one of the best things I have done as a cook.

Learning to properly use knives, especially chef’s knives, is a skill that every cook can use. I just returned from a long trip to Italy and France (plus a few stops in the Western Mediterranean). I’ll report on some of the places and foods in subsequent posts, but I thought this would be a good return info post as it’s a topic that’s so useful for all cooks.

The class was held at a local kitchen store in Santa Cruz, Toque Blanche, http://www.mytoque.com, a comprehensive source of all kinds of kitchen items, including a very good stock of knives, with a full range of types and brands. They also professionally sharpen knives for a reasonable fee.

5 Main “Never Do” Points

You may know these but they’re a good reminder:

1. Never put chef’s knives in the dishwasher; (most chef’s knives have wooden handles and the blades can be damaged).

2. Never use the blade to scoop anything off a cutting board- use the back of the knife.

3. Never use a chef’s knife on plastic or glass boards (they dull the blades). Composition/wood boards are best.

4. Never chop bones with a chef’s knife —it can chip the blade; (use a cleaver instead).

5. Never leave chef’s knives in a wet sink- some blades may rust. Wash and dry your knives after use.

Sharpening vs. Honing

Honing: This confused me for a long time. Actually, honing is the action using a honing stick or wand that is recommended every time you use a chef’s knife; just 2 or 3 slides on each side of the blade at approximately 15 degree angle will reform the metal. (I used to do this at a more extreme angle but have learned that is not correct). Some honing sticks have a guide that shows or guides the proper angle.

Sharpening: Sharpening is only necessary once or twice yearly. It is a process of grinding the blade and thus takes off some of the metal. It can be done with commercial sharpening equipment you can buy, or by professional knife sharpeners.

There are many types of chef’s knives, including stamped (blade is cut from a piece of metal and stamped out); forged, (made from a single bar of metal, heated and then pounded into shape- typically heavier and more sturdy then stamped knives, and has a wider lip, called a bolster, on the end of the blade where it meets the handle), Japanese knives (including Santoku, Gyuto), which have a different shape than Western chef’s knives. Chef’s knives range in length too, typically from 8” to 11”. My brother gave me the 11” ( Wusthof, a good brand made in Germany), which intimidated me at first but now I appreciate the length as I know better how to use it’s leverage for chopping.

Another important tip is to hold a knife by the bolster- and make sure you “claw” your other hand as you chop.

Holding a knife near the bolster

Properly holding a chef’s knife by the bolster ( the wide part between the handle and the blade)


This is just an overview of best knife practices- and that’s the main thing- practice!

Enjoy til next time!

Knife skills class- people using knives

Knife skills class- people learning to use knives properly


www.type2delicious.com

New Chicken Cacciatore

Chicken and vegetables cooking in delicious tomato sauce

Chicken and vegetables cooking in delicious tomato sauce

cooking the vegetable and chicken in the sauce

cooking the vegetables and chicken in the sauce

The weather has been very cold and dreary even here in Santa Cruz; (although nothing as cold and dreary as in the MidWest and East Coast)–I am very sorry for those who’ve experienced such cruel temperatures and conditions. When an old friend we hadn’t seen for a few years told us that he was coming for a visit I was looking forward to sharing a meal with him. I know he has a reputation as a “foodie”–someone who knows and enjoys good food. He has a pretty sophisticated palette, but also appreciates good home cooking. I wanted to make something delicious and very tasty, “comfort food” for this weather, as well as a recipe that can be made in advance so I can spend as much time as possible with our friend. This Chicken Cacciatore fits the bill!  Not only is it very delicious and satisfying, it can be made in advance. This recipe even makes enough sauce to freeze for future use. What’s new about this Chicken Cacciatore is the addition of extra vegetables, including zucchini, carrots, and mushrooms as well, of course, the traditional tomatoes, onions and garlic.

Be the way, after dinner, our friend told his wife (who was unable to come) that it was so delicious and asked for this recipe. Now you, too, can please your  family and foodie friends!


New Chicken Cacciatore


Ingredients (Serves 3-4)

  • 1 3-4 lb. chicken, cut up, or 3-4 whole legs (cut apart drumsticks and thighs)
  • 1/4 cup all-purpose flour
  • Salt and pepper to taste
  • 2 tablespoons olive oil
  • 2 tablespoons butter
  • 1 large onion, chopped
  • 1-2 carrots, sliced in 1/2″ rounds
  • 1 lb zucchini, sliced in 1/2″ rounds
  • 1/2 pound sliced fresh mushrooms (I usually use Cremini but have a new find–Pompioni, an Italian type I sometimes get from my organic market)
  • 1 can (28 ounces) tomatoes, cut up and juice reserved
  • 1 can (8 ounces) tomato sauce
  • 1 can (6 ounces) tomato paste
  • 1 cup dry red wine or water (I use only the wine–but up to you of course)
  • 1 teaspoon dried thyme
  • 1 teaspoon dried rosemary, crushed
  • 1 teaspoon dried oregano
  • 1 teaspoon dried basil
  • 3 garlic cloves, minced
  • 1 tablespoon sugar (or Xylitol)
  • Hot cooked pasta
  • Grated Parmesan cheese
    • TO DO:
    • Dust chicken with flour. Season with salt and pepper. In a large skillet, brown chicken on all sides in oil and butter over medium-high heat. Remove chicken to platter.
    • In the same skillet, cook and stir the onion, carrots, zucchini and mushrooms for 5 minutes. Stir in the tomatoes, tomato sauce, tomato paste, wine, herbs, garlic and sugar/Xylitol.
    • Bring to a boil. Reduce heat; cover and simmer for 30 minutes.
    • Return chicken to skillet. Cover and simmer for 45-60 minutes or until chicken is tender. Serve over pasta and sprinkle with Parmesan cheese.
      Freeze option: Cool chicken mixture. Freeze in freezer containers. To use, partially thaw in refrigerator overnight.
    • Heat through slowly in a covered skillet until a thermometer inserted in chicken reads 165°, stirring occasionally.
    • Or just freeze the excess sauce to use for future delicious meals–also good with pork chops or sausages.
      • Serve with whole grain pasta, grated cheese and a green salad, with a vinagrette dressing, as I often recommend. (Check out the delicious salads on my blog; such as the link here:
        • ENJOY!
          • Nutrition Facts: 4-1/2 ounce-weight: 517 calories, 25g fat (8g saturated fat), 112mg cholesterol, 790mg sodium, 28g carbohydrate (13g sugars, 6g fiber), 39g protein.


German Tangy and Sweet Red Cabbage


Bowl of Red Cabbage made with sugar and vinegar on a mosaic table My Grandma’s Sweet and Tangy Red Cabbage (RoteKraut) 


It’s that time of year again? Wow- so fast! This year we’re having Tday 1 early, a week before the actual day, as I’m having a knee replacement early December. It will be at our house again with my son Alex, his girlfriend Shannon, a few friends, and my son-in-law’s parents. (My son-in-law is in the Navy, stationed in Japan, with my daughter and our two grandkids. I’m making authentic German red cabbage. Actually, it was my son’s request–and I was happy to make the recipe. It’s very easy. The trick for the best results is to use no water, just red wine and red vinegar for the liquid. Also it does take a few hours to cook to the right tenderness and flavor, but is just as good if made in advance and reheated. In fact, that’s my favorite method.

When I have had red cabbage at most German-type restaurants I find it too sweet. The way my Grandma made it it is on the tangy side, with just a hint of sweetness, from the apples and sugar, (in this case, Xylitol. ( If you’ve been following my blog, you know that’s my preferred sweetener for low carb sweetening.) It’s such a great way to enjoy a dish that’s not often served, that is low carb, low calorie, and is full of flavor, fiber, and nutrition *.


Dining table with my son and his girlfriend at the end Thanksgiving2–my son and his GF at our table

GERMAN TANGY AND SWEET RED CABBAGE

INGREDIENTS

  • 1 red cabbage (size–your choice) this recipe is for about a 1-2 lb, cabbage
  • 1-2 apples,  sweet/tart, such as Pink Lady, or Pippin, cored and chopped (I do peel them, but leave some peel on)
  • 1-2 Tbsp. unsalted butter (the butter gives a smoothness to the result)
  • 1 cup dry red wine (use more if the cabbage is drying out)
  • 1/2 cup good quality red wine vinegar
  • 2-4 Tbsp. Xylitol –to taste
  • Salt or Salt free seasoning–to taste

TO DO: (serves 4-6 as a side dish or 2 with leftovers)

1. Remove cabbage outer leaves and inner core; chop cabbage into approx. 2 “ pieces

2. Core and peel apples, and chop into approximately 1/2″ pieces

3. Add all ingredients into a Dutch oven or 4 qt. pot.

4. Cook on stovetop for approx. 3-4 hours, tasting for sweet/tangy balance and tenderness

That’s it!

Serve as a side dish; and, as we usually have, a crisp green salad with a tart, lemony vinaigrette–see previous Salad posts for the vinaigrette recipe: https://wordpress.com/post/type2delicious.com/1075

Enjoy!

*https://www.livestrong.com/article/272966-red-cabbage-nutrition-information/

www.type2delicious.com

Eggplant Cheese Stacks

stacks of eggplant topped with cheese and marinara sauce

Delicious eggplant stacks!

I’m reposting this eggplant recipe as I just made it again a few nights ago. It had been awhile and I remembered how delicious and easy this is! If you’re a fan of Eggplant Parmesan, but want to lower the calories and carbs, this is for you. The key is baking and not breading the eggplant. We also use non-dairy cheeses but that’s not a carb issue. Also we love eggplant in almost any dish. This is a favorite.

This dish is easy to make; scrumptious, rich tasting and especially satisfying as a treat with good friends; to share with a good glass of chianti and a fresh green salad, such as Persimmon and Endive Salad. 

By the way, Rick is doing very well with his reduced carbs, exercise, including walks after dinner, and lots of veggies and fruits. So far no meds necessary!

Eggplant Cheese Bake (type of Eggplant Parmesan)

INGREDIENTS

  • 1-2 eggplants (choose ones that are full and glossy, deep purple colored)
  • 32 oz. jar of marinara sauce (make your own from canned or fresh tomatoes, garlic and olive oil, or buy prepared – I’m a fan of Mezzetta’s sauce for this dish.)
  • 1/2 lb. cheese in slices (we use Dayna’s non-dairy Jack but if no dairy issues use mozzarella or regular Jack)
  • cheese for grating (again, goat Midnight Moon* or regular Parmesan)
  • Optional- 2-3 tsp Breadcrumbs for topping
  • 1-2 Tbsp olive oil

TO DO:

1. Wash and slice eggplants into 1″ rounds; preheat oven to 400.

2. In a bowl, shake eggplant slices with 1 Tbsp olive oil.

3. Lay parchment on baking sheet and lightly spray with olive oil. Arrange eggplant slices in a single layer on parchment.

4. Bake eggplant for 20 minutes until almost tender.  Remove from oven.

5. In a 9×13 casserole (I use Pyrex); spread about 1/2 cup of marinara sauce.

6. Make a stack base of eggplant in a single layer on top of the sauce, usually 6-8 slices; (depending on the size of your eggplant).

7. Top each eggplant slice (stack base) with a slice of cheese, grated cheese and a dollop of sauce. Stack  remaining slices evenly on the bases, using the same order of ingredients.

8.  Top the dish with remaining sauce, add grated cheese and, if you like, about 2-3 tsps breadcrumbs.

9. Bake for 30 minutes until bubbling and cheese is melted.

Remove from heat and let set for 10-15 minutes. Serve at least one stack per person.

* http://www.cypresscreamery.com

www.type2delicious.com

Super Califragalistic Cauliflower!

Rick and I went to Birba, an excellent restaurant in Palm Springs. It’s a popular place with all outside tables and beautiful lighting, especially enjoyable on a warm night. We loved all the food, but were especially blown away by the cauliflower. It was served whole; twice cooked; boiled first and then baked with cheese. It’s actually quite simple to make and is a wow dish to serve your friends and family as a side dish; (true confession–we usually make one and eat it all ourselves).

I’ve tried to reproduce the dish we had at Birba, but have made my own variation, with more of an Indian spice flavor. You can use other spice combinations that you like, such as Italian seasoning, dill or basil. The main thing is the first steam or boil the vegetable whole, then add seasoning in an olive oil base, grate cheese on top and bake. Looks very elegant and tastes delicious!

Whole Cauliflower with topping of smoked paprika

Cauliflower with smoky paprika

Whole Cauliflower topped with grated cheese

Cauliflower topped with grated cheese

Baked whole cauliflower, topped with melted cheese

Baked cauliflower, ready to be served


Twice Cooked Cauliflower (serves 2-3, depending on size of cauliflower) 

INGREDIENTS

  • 1 Cauliflower (or make two to serve four or more)
  • 1 tsp. Turmeric
  • 1 tsp. Coriander
  • 1/2 tsp. Cumin
  • 1-2 cloves garlic, minced
  • 1-2 tsp. capers
  • Smoked Paprika
  • 1/3 cup grated aged goat or cow gouda, or Parmesan
  • 1/4 cup Olive oil
  • Lemon Pepper
  • Salt-free seasoning, pepper; or 1tsp. salt–your choice
  • TO DO: (Preheat oven to 400 degrees before baking) 

1. Wash and core cauliflower, but leave whole.

2. Boil cauliflower with approx. 3 inches of water, in a 4-6 quart oven proof pot, such as Calphalon, or Corning ware, until still firm, 10-12 minutes (test with knife)

3. Whisk all spice ingredients and capers in olive oil, except for Smoked Paprika.

4. Pour olive oil mixture over cauliflower, getting into crevices. (You can do this in advance–marinate the cauliflower by pouring the mixing over it and letting it sit for an hour or so before baking.)

5. Sprinkle paprika, and grate cheese on top.

6. Bake for 20-30 minutes, until brown and cheese is melted.

Serve as a side dish; and, as we usually have, a crisp green salad with a tart, lemony vinaigrette–see previous Salad posts for the vinaigrette recipe: Persimmon and Endive salad; (can be made with pears, orange/tangerine pieces or even strawberries, depending on the season).

Enjoy!

www.type2delicious.com

Favorite Meatloaf with Italian Tomato Paste Topping

Meatloaf with Italian tomato paste topping

Meatloaf with Italian tomato paste topping

It’s that time of year when I crave something warm and cozy to eat; ok, ”comfort food.” And my favorite is Meatloaf. Besides being satisfying and delicious right out of the oven, you can make my favorite
sandwiches on good whole grain toast the next day
(or two). With ketchup of course! You can make this Meatloaf with ground turkey or a ground beef/pork mixture depending on your preferences. It’s delicious either way.

I confess we often watch TV while we eat, and meatloaf sandwiches are just great to munch while watching British mysteries! Of course, Rick being the disciplined guy that he is takes a walk every evening after dinner to lower his blood sugar; I join him often; see the Journey for more Type2 diabetes lifestyle tips.

I’ve recently discovered something that makes my favorite Meatloaf topping very special and easy. It’s Italian tomato paste in a tube. You just squeeze out what you want – I like to make squiggles that melt and spread while cooking. Instead of opening a can and only using a small amount and the remainder then usually sits in my fridge and I forget about- yes, it goes bad and I throw out once I notice it!

INGREDIENTS (2-3 servings, plus leftovers)

  • 2-21/2 lbs ground turkey (I prefer thigh only as it’s juicier); or a ground beef/pork mixture
  • 1/2 large or 1 medium onion, chopped fine
  • 1/3 cup Cremini mushrooms, chopped fine (optional)
  • 1 8 oz can tomato sauce
  • 2 slices whole grain bread
  • 1 egg, beaten
  • Italian tomato paste for topping
  • Thyme, and/or salt-free seasoning/pepper to taste

TO DO:

1. Mix turkey or meat with chopped onions, beaten egg and spices- I use my hands.

2. Sauté mushrooms in butter; after they’re browned (about 6-7 minutes), let Cool

3.  Add mushrooms to mixture. Set aside

4. Mix tomato sauce with bread in a bowl- mash with fork til completely mixed and bread is soft.

5. Combine all in a bowl- best using hands again.

6. Put meatloaf mixture in a loaf pan prepped with an oil spray; Pam or olive oil spray works fine.

7. Squeeze tomato paste on top

9. Bake at 375 for 40 minutes. Turn oven off and let sit inside for another 10-15 minutes.

10. Serve with your favorite whole grains and a great salad – this is a delicious one with goat cheese, persimmons and greens.

Enjoy!

www.type2delicious.com